To add or amend nominee follow below steps.

Step 1 - If you are using Prostocks Star Web application then go to Status option available on your web dashboard. (Refer below screenshot)
OR
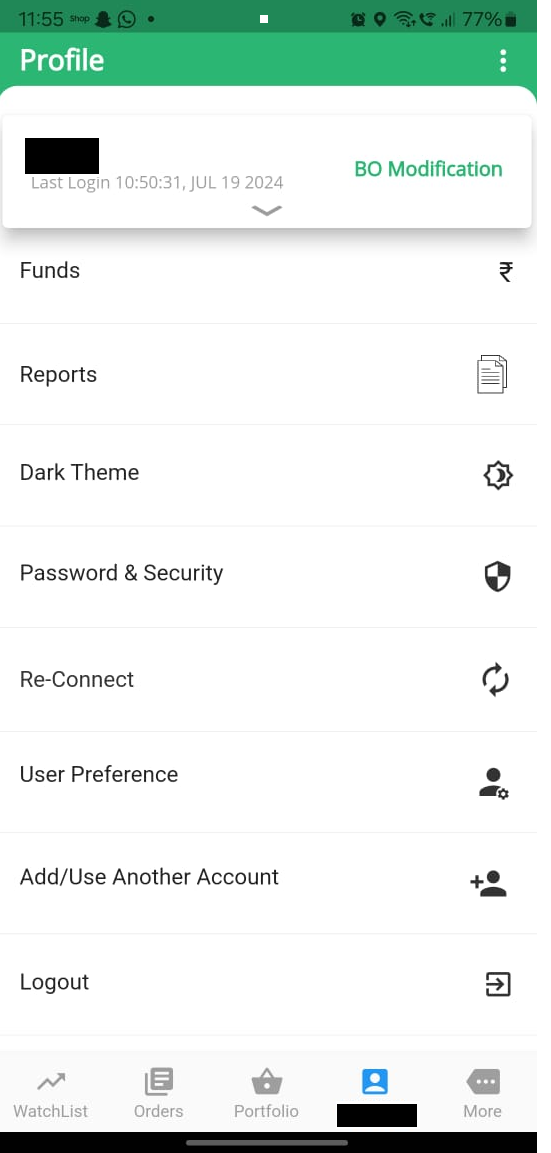
If you are using Prostocks Star Mobile application then go to Profile option and click on Add/Modify.
Step 2 – Then click on BO Modification.
Step 3 – After clicking on BO Modification you will get an option to Add or Amend Nominee click on that.
Step 4 – Next you’ll get a Nomination Form where you need to fill the details of your nominee. After filling all the details click on Generate PDF and then click on Generate Digitally Signed PDF.
Step 5 – After clicking on Generate Digitally Signed PDF you’ll get an option to send authentication code on your registered mobile number. First confirm your mobile number and then click on Send code to Mobile. You’ll get 5 digits security code on your registered mobile number, once you submit the code, you’ll get an option to Sign Now click on that it will take you to the NSDL E-sign page.
Step 6 – In last step you need to do E-sign using your Aadhar Number and OTP to complete the process.
Step 7 – After completing E-sign please send digitally signed PDF on [email protected]. Mention “Request for Nominee Addition” in subject with your Client Code.


Comment (0) Hits: 7269

What is an After Market Order (AMO)?

After-Market Order (AMO): An order that is placed post-market closing and before the beginning of the next trading day.


How can one place an After-Market Order?

To place an After Market Order, please follow these steps:

  • Step 1: Search and select the stock you want to place an order in from your watchlist.
  • Step 2: Select the stock and click on either Buy or Sell
  • Step 3: The order entry window will open, click on the AMO checkbox and swipe to place your order.
  • Step 4: Verify placed order in the order book – can be modified or canceled.

When can one place an After-Market Order?

Segment Start Time End Time
Equity (Pre-Open) 04:00 pm 08:58 am
Equity (Normal Market hours) 09:08 am 09:13 am
Equity (Post Closing) 03:30 pm 03:38 pm
Futures and Options 04:00 pm 09:13 am
Currency Derivatives 05:00 pm 08:58 am

What are the advantages of an After Market Order?

An AMO is very useful for people who are busy during market hours but wish to place orders nevertheless. Orders can be planned at one’s convenience even before the market opens.


When does an After Market Order execute?

Equity Segment: Orders that are placed by 08:58 am and meet the Pre-Opening order criteria will get pushed to the Exchange at 09:00 am, otherwise at 09:15 am and remain open till the market closes for the day, after which they will stand canceled.

Futures and Options, and Currency Derivatives AMO will get executed during normal market hours if the price is matched, or else such orders will stand canceled.

Pre-Opening order criteria:

  • Scrip should be a part of the pre-opening session
  • The order should be a normal limit order and not any type of conditional order.

What happens if the After Market Order is not executed?

After Market Orders that do not get executed during normal market hours will stand canceled.


What are After Market Order charges?

We do not collect any additional charge for such orders.


Are After Market Orders available for E-DIS clients?

AMO Equity sell orders can be placed before doing E-DIS, however, E-DIS has to be done before 09:00 am.


After_Market_Orders
Comment (0) Hits: 10189

We have an important update regarding Quarterly settlement of Running Account of Client’s Funds lying with ProStocks:

What is present practice of Quarterly Settlement of funds?

Present SEBI regulations requires that every stock broker should do settlement of funds for each client by returning excess (surplus) funds (balance) lying with Stock broker, once in every calendar quarter and gap between two such settlement should not be more than 90 days.

Stock broker are free to decide day of settlement and which can different day for different client.

This does not mean client will not get funds as and when requested. Clients are free to request withdrawal of funds as and when they wish and as many time as they want.

This settlement means whether the client has requested or not, Stock broker must return the excess funds once in every calendar quarter.

How to calculate surplus (excess) funds:

Clear Credit balance on the day of settlement:

Less: Funds PayIn due from client in next two working days

Less: Margin Obligation on unsettled open position

Less: 125% of Margin Obligation on the day of settlement

Balance if positive is Surplus / Excess funds. If negative it is deemed settlement, as nothing is payable under settlement mechanism.

What is the new change?

As per new SEBI circular SEBI/HO/MIRSD/DOP/P/CIR/2022/101, effective from Oct 2022 to Dec 2022 quarter,

All Stock Brokers across exchange and segment needs to do settlement of funds of all their client on First Friday of every calendar quarter. This has market wide impact.

First such date for settlement is 7th October 2022. We will initiate the settlement on the 7th and the funds should come to your bank account between 7th Oct 2022 night and 10th October 2022 morning. Since all the Stock brokers are doing across all their client on one single day may cause pressure on banking System and there may or may not be delay.

Important points to note:

  • Surplus funds as per above method will be returned to you, you can transfer them back on 8th or 9th of October for use on 10th of October i.e. Monday.
  • Avoid transferring funds to ProStocks using net Banking Payment Gateway on 6th Oct and 7th Oct 2022 ( except HDFC Bank or Yes bank Account) , as we do not get funds on real-time from payment gateway service provider. Please use NEFT / RTGS / IMPS / UPI or HDFC and Yes Bank Net Banking gateway.

Upcoming 4 Quarterly settlement dates are:

  • 7th October 2022
  • 6th January 2023
  • 7th April 2023
  • 7th July 2023
  • Comment (0) Hits: 6897

    Dear ProStocks Customer,

    We have an important update regarding your Trading account login:

    As per new Exchange Regulations, We need to implement Two Factor Authentication (2FA) login for your Trading account on or before 30th September 2022 in which one of the authentication factor need to be possession based.

    Please refer NSE Circular Reference: 36/2022 (PDF).

    How to login for the first time post Two Factor Authentication implementation?

    Click on Get OTP option and proceed to enter USER ID and PAN to receive OTP on registered email address and mobile number (SMS will only be sent to Resident clients)

    Enter Client Code, Password and the OTP received on email/sms to login to the mobile application.

    Once logged in, you can enable either Biometric or Google Authenticator to login instead of requesting for an OTP every time before login.

    Biometric Login Activation (Most preferred option)

    Login to the mobile application, use Password and Security option from user option to enable Biometric login. (Face ID and Fingerprint are accepted)

    Once Biometric is enabled, the next time you login, Mobile application will first authenticate Face ID/Fingerprint and then ask for the Client Code and Password to login.

    TOTP: (Time Based One Time Password):

    TOTP can be generated by using Google Authenticator application on your Mobile or Laptop/Desktop.

    Google Authenticator:

    Play Store: https://play.google.com/store/apps/details?id=com.google.android.apps.authenticator2

    App Store: https://apps.apple.com/in/app/google-authenticator/id388497605

    Steps to Enable TOTP:

    1. Download Google Authenticator application and click on ‘Get Started’ option.
    2. Enable TOTP by using ‘Authenticate using TOTP’ under Password and Security option. Click on ‘Add to Authenticator’ to add the account in Google Authenticator application (You can also scan the QR code to add the account to authenticator application)

    3. Authenticator will automatically open once you click on ‘Add to Authenticator’ and ask you to save key for your Account, click on ‘Okay’ to add the account to your Authenticator application.

      ‘PROSTOCKS STAR’ will now be visible in the Authenticator application. OTP will auto generate every 30 seconds, long press on the OTP to copy the OTP and paste it on OTP/TOTP section of the login screen.

    Two Factor Authentication login for ProStocks Star Web:

    If TOTP has already been enabled for Mobile application, same can be used for Web login as well.

    Step 1: Click on the ‘Get OTP’ button and enter PAN to receive OTP on your registered email address.

    Step 2: Once logged in, go to the user option and enable TOTP option to login instead of requesting for OTP every time.

    Step 3: Scan the code from your Google Authenticator App and it will automatically add ProStocks Star to your application. Now you can use this TOTP along with Password to login. (Also refer Screen 3C and 3D).

    Two Factor Authentication login for ProStocks Star Desktop:

    If TOTP has already been enabled for Mobile application, same can be used for Desktop login as well.

    Step 1: Click on the ‘Get OTP’ button and enter PAN to receive OTP on your registered email address.

    Step 2: Once logged in use the Help option to access Profile and enable TOTP. Click on 2FA to view the QR code for Google Authenticator.

    Step 3: Scan the code from your Google Authenticator App and it will automatically add ProStocks Star to your application. Now you can use this TOTP along with Password to login. (Also refer Screen 3C and 3D).

    Important Note: This is an industry-level change initiated by the Exchanges for the protection of the Investors.

    We strongly recommend clients to use Biometric option to login to mobile application and TOTP option for Web and Desktop.

    OTP : One time numeric password received through Email or SMS

    TOTP : Time based numeric OTP generated through authentication app like Google Authenticator

    In case of any difficulty, please do write to [email protected] or call +91-22-62434343 and press 3 for tech support.


    Team ProStocks

    Comment (0) Hits: 9230

    As per G.S.R. 112(E) dated 13th February, 2020 of Government of India it is mandatory for Indian Resident who is having PAN should link their Aadhaar on or before 31st March 2022.

    As per Section 139AA (3) of https://eportal.incometax.gov.in/iec/foservices/#/login" target="_blank">Income Tax Act 1961 Non-Resident Indian (NRI) are exempt from quoting Aadhaar if they do not have Aadhaar Number and their NRI status is captured in Pan database.

    If you are Non-Resident Indian (NRI) and do not have Aadhaar Number then kindly go to the https://eportal.incometax.gov.in/iec/foservices/#/login" target="_blank">Income Tax website and Submit Grievances to update your Resident Status as Non-Resident Indian (NRI) at the earliest.

    PAN will become inoperative if a client failed to inform his/her NRI Status to https://eportal.incometax.gov.in/iec/foservices/#/login" target="_blank">Income Tax Officer.

    Only https://eportal.incometax.gov.in/iec/foservices/#/login" target="_blank">Income Tax Officer has software to do this marking. Please note that PAN Database does not have Residential status as NRI even for those NRI who are filing Return as NRI from many years. PAN Database does not capture status as NRI by merely filing Return of Income as NRI.

    Kindly follow below steps to Submit Grievances from https://eportal.incometax.gov.in/iec/foservices/#/login" target="_blank">Income Tax website (This may or may not work, suggested method is to write to your Assessing Officer (AO) and get changed the status in PAN Database)

    Step 1 - Click on the following link and login to the https://eportal.incometax.gov.in/iec/foservices/#/login" target="_blank">Income Tax portal buy using your Pan Number and Password https://eportal.incometax.gov.in/iec/foservices/#/login

    Step 2 - Then go to Grievances option on menu bar and click on Submit Grievances

    NRI_PAN_Linking_with_Aadhaar

    Step 3 - On Submit Grievances page select Department as AO

    NRI_PAN_Linking_with_Aadhaar

    Step 4 - On next page select Category as Pan related application and Sub-Category as Change of Citizenship Flag and click on Continue.

    NRI_PAN_Linking_with_Aadhaar

    Step 5 - In Grievances Description box you need to write following message – “I am Indian Citizen and Non-Resident Indian (NRI). As per Section 139AA (3) of https://eportal.incometax.gov.in/iec/foservices/#/login" target="_blank">Income Tax Act 1961, NRI are exempt from quoting Aadhaar if they do not have Aadhaar. I do not have Aadhaar. Please mark my residential Status as NRI in Pan Database so my Pan does not become inoperative.”

    NRI_PAN_Linking_with_Aadhaar

    You can also attach documents as a proof of your NRI Status and then click on Submit Grievance

    NRI_PAN_Linking_with_Aadhaar

    Please go to the below link to watch video

    https://www.youtube.com/watch?v=Yph4rkfLZBQ

    Comment (12) Hits: 25979

    Page 1 of 5

    Latest Articles

    13 September 2021
    26 December 2019